Showing posts with label mac. Show all posts

Saturday, March 23, 2013

Brush Week: 7 Brushes You Need

the basics.

My heart sinks when I see people use the cheap spongy applicators that sometimes come with shadows, powders, and foundation. Reason being - they apply your makeup horribly and are incredibly unsanitary. Most makeup enthusiasts would agree - your makeup brushes are arguably more important than your actual makeup products. 

the seven brushes you need:

stippling brush. 
Say hello to my little friend, the Mac 187. It's technically a stippling brush, but it does an awesome job of making skin look airbrushed and perfect. This is the kind of brush that can make your drugstore foundation look like a million bucks. Here's how to use a stippling brush

powder brush. 

Use a powder brush after applying water based foundation to lock and seal your makeup all day. I use this brush differently than most, and I learned the technique here (fast forward to 3:00). Instead of fluffing the brush around your face with powder on it, pack the product on the sides of the brush bristles, and pack it onto your face. This will keep your makeup to stay in place all day. After applying, lightly brush off excess from your face so it doesn't appear cakey. I also use a powder brush after contouring to blend any harsh lines. 

blush & bronzer brush.
Okay, so if this was "top 8" brushes, blush and bronzer brushes wouldn't be in the same category. However, in a pinch I can use the same brush for both without noticing any real difference. To illuminate your face and give it a glow, use a blush brush (say that five times fast) to swipe some blush or highlighter on your upper cheekbones. This brush applies a light and even layer and allows your to easy big pigments on top of each other. With bronzer, sweep into the hollows between your cheekbones and jaw. 

stiff eyeshadow brush.
Use this brush as your primary eyeshadow applicator for lid colors. 

crease brush.
Use this brush to apply colors into your crease. Crease colors are also known as a transition color, because it helps give your makeup more dimension. 

dome eyeshadow brush.
Use this brush to blend all your eyeshadows after they've been applied. This gives your eye-makeup a flawless finish, and will ensure no one is seeing weird eyeshadow lines or definitions that aren't supposed to be there.

eyeliner/brow brush.
One of my favorite brushes. This bad boy is amazing for lining your bottom rims, cutting your crease, and even applying a dark eyeshadow as a liner. I have several of these brushes because depending on the bristles, it can be used so differently!

so there you have it!
I hope you all enjoyed BRUSH WEEK as much as I did, and leave any questions below. Brushes are not best learned from reading a blog, but instead getting in front of a mirror and trying it all out. So go, have fun, because that's what this is all about. Till next time! 


Monday, March 11, 2013

steal my lashes

they're real.
If there's one thing I get complimented on, it's my lashes! I attribute it completely to mascara application. Keep reading to see how you can steal my lashes.

line your lashline.
Even if it's just a thin line, make sure to line your upper lash line. This will make the base of your lashes look thicker and instantly fuller. 

layer your mascara.
Most important step. The trick is not just adding layers of mascara, but add layers of different types of mascara. My tactic: start by adding 2 coats of a mascara that lengthen your lashes without clumping. This provides a nice clean base to build from. While your lashes are still wet, layer your favorite volumizing mascara. Continue adding coats of the volumizing mascara until you find your desired effect. On days that I want really dramatic long lashes, I add another coat of a super black volumizing mascara. In all, I can apply about 10 - 15 coats, easy. The key is finding mascara formulas you like working with. A bad formula will make this look turn sour quickly. This routine may seem extreme at first, but once you see you lashes, you might never look back!

get in there.
If you want huge lashes, you've got to get up in a mirror and coat  e v e r y--s i n g l e--l a s h. Experiment with the way you hold the mascara wand, they way you coat your lashes, ect. I can easily spend up to 10 minutes(yikes!) on my lashes, so adjust this routine however you'd like. Who wants to see a video tutorial??


*I've linked my current mascara routine products. My routine changes monthly because I love trying new products. Maybe I'll post about my all time favorite mascaras!

Friday, March 8, 2013

Concealer 101: Hey Uncle Fester!


Alright ladies. You want to hide your under eye circles? You can. It's going to cost you a little bit of money, and you're going to have to take a few minutes to learn. But if you are committed, it will be the best thing you ever did for your face. Keep reading to learn how to hide those raccoon eyes!

Step One: Trip to the store
Drive to your favorite high end makeup pro store or counter (Mac , Bare Minerals, Clinique, Sephora, ect.)  Ask to speak with an employee with several years of artistry experience. Tell them exactly what you're looking for - a full coverage under eye concealer. They'll recommend and try as many samples on you as needed to find your perfect match and shade. Congrats - hardest part is over! 

Step Two: Old-dog learns a new trick
After you find a concealer you like, ask the employee to teach you how to apply it. This is very important because if you don't understand how and where to place your concealer, it's not going to hide anything. A good employee will be more than happy to teach you.

Step Three: Keep it up
The first week using your new concealer is going to be weird. Unless you're a natural pro, it will take a little trial and error. Just keep at it- nothing worthwhile comes easy.  :)
______


concealer: pinkache's powerful tips:

  • Apply in light layers. Build your concealer, don't slap it on like a sloppy joe!
  • Drugstore concealers are usually disappointing. Concealer gets my approval to splurge a little bit.
  • Always set your concealer with your favorite powder foundation or translucent mattifying powder. This will keep it firmly in in place all day. It makes your whole face look fresh all day.
  • Take it back if you don't like it! 99% of the time, professional makeup retailers graciously allow returns. They understand - you have to find what works for you!

pinkache recommends:

  • Laura Mercier Secret Camouflage Concealer
  • Benefit Boi-ing Concealer
  • Kat Von D Tattoo Concealer (even if you don't have tattoos!) I don't like her either, but she makes a pretty nice concealer.
Good luck! Comment your pictures!

Wednesday, March 6, 2013

favorite lipsticks: drugstore dupes

Hi. Do you love lipstick? Do you love saving money? Perfect - read on.

A "dupe" is a cheaper alternative, or duplicate, to a higher end luxury product.  There are many self proclaimed dupes out there, but you never really know till you try.  For example - think GT Cola VS Coca-Cola, or Mountain Mist VS Mountain Dew. A lot of times, the cheaper version just seems off.

Revlon Berry Haute
Once I dabbled in high end lipstick, I realized for a fraction of the price, you really don't have to compromise on quality. Best part: they are nearly identical to popular high end lipsticks. Here are my faves. You can purchase all my favorite drugstore lipsticks at any drugstore (walmart, walgreens, CVS, target, ect ) or Ulta. You're about to notice an annoying trend, but whatever. 

Revlon Berry Haute
Dupe for: MAC Up the Amp
This gorgeous plum purple is so versatile and looks great on everyone. It's dark enough to look festive for the winter months, but it's got a bright toned purple to it that justifies wearing it in the spring and summer months too. It's super creamy and moisturizing.

Revlon Really Red
Revlon Primrose
Dupe for: MAC Snob
Ugh - this color! It's the perfect light pink that makes blondes look like barbie; and makes brunettes look like they are out for blood. Other than it's delicious hue, it's so light and smooth that you don't feel like you're wearing lipstick. I've repurchased this twice and will continue to do so! 

Revlon Really Red (I buy the matte finish)
Dupe for: MAC Russian Red
This is some Marilyn Monroe shixxx right here. I'm not a huge red lipstick wear-er, but when I am, this is my go-to. I also love blending this one with my next favorite to tone it down a bit. This color looks good on everyone, but I think it's best on blondes. 
NYX Circe 

NYX Circe
Dupe for: MAC Viva Glam Gaga II
It was a sad, sad day when the Gaga II lipstick stock was finally out, those pesky limited editions. So I was ecstatic to find something that would at least fill the void. Fortunately the color match is almost identical, but the formulation is sub par. Oh well - it's still one of my faves. The color is a nude with an orange tint. Sounds weird, but goes amazing with a smokey eye and a night out. And for $4, I love it!

Tuesday, February 19, 2013

Designer VS Drugstore


It’s easy to feel like you have to use designer brands to do a quality job, but ‘you get what you pay for’ doesn’t always apply in the makeup world. To this day, I still opt for many drugstore options because they perform the same as designer labels (if not better,) and you save a ton of money in the process. In the past week, I’ve worked with two professional makeup artists who agree that many high end products aren't worth shelling out the extra dough when given the option. 

Mascara: Go Drugstore
Drugstore brands tend to have tons of options for the exact effect you’re looking for (volume, length, shape) and IMO work much better than designer brands. The product lasts you a long time, and they exceed my expectations every time. For long and voluminous lashes you have to mix products anyway, so mascara price stays manageable when you go drugstore. So many drugstore mascara brands are kicking ass right now with their products, packaging, and marketing – it’s an amazing time for consumers right now!

Higher end products have the tendency to irritate your eyes, clump up your lashes, and dry out extremely fast. A designer mascara can easily run you anywhere from $20 - $50. For me, drugstore mascara is a no brainer.

Foundation: Go Pro
A wise woman builds her house upon a rock, right? Foundation is your rock: sturdy, reliable, & trusted. If you build your house upon the sand, aka cheap foundation, you may find yourself disappointed with the color match, coverage, skin reaction to the formula, and worst of all, you may have wasted your money because now you have a product you really can’t use. Oh and there’s the possibility doesn’t actually covering your blemishes, but just looking slapped on. Not cute!

Now hear me out - this is not to say that you have to spend a fortune on foundation. But you should definitely go to a store where you can sample the foundation, color match, test your skins reaction, and wear it for a day before purchasing. Places like Ulta, Sephora, and most department stores will even give you a free three day supply of foundation to test for a few days. AND they can help you pick which foundation will work best with your skin type. When you pick a random drugstore brand, you may end up disappointed with the color match, breaking out from the formula, and worst of all, you may have wasted your money because now you have a product you really can’t use. You can get away with just $20 for a good foundation. My favorite foundation (MAC Studio Scuplt in NW20) runs me $43.

I will say that lately, drugstore brands have stepped up their game in the foundation department. Maybelline FitMe and Loreal TrueMatch are helping consumers save money without losing too much quality. So tell me – have you found an amazing drugstore foundation?

Lipstick: It Depends
Lipstick is like shampoo. We’d all love to always use the super expensive shampoos, but most of us know deep down that a bottle of Herbal Essence will do the trick. Lipstick’s kinda the same way. I love my drugstore lipsticks almost as much as I love my MACs. Revlon lipsticks are always extremely impressive. I’m not a fan of Maybelline lipsticks because they are usually all shine and very little pigment. 

Monday, February 18, 2013

Favorites: 2012

From my makeuped & pinkached heart to yours, my favorite products of 2012

foundation:
MAC Studio Sculpt (NW20)


Everything I thought about foundation changed when the MAC artist first painted this on my face. It was easy to apply, left my face looking & feeling flawless, and stayed put for 8 hours. It's a buildable gel-based foundation that leaves your skin with a dewy complexion. If you prefer matte skin like I do, just apply your favorite powder on top.  I've repurchased 5/6 times. The gel-based formula is best for normal to dry skin, & may be too much for oily skin types.

Foundation is one of those products every girl should should invest in. Buying higher end ensures you can sample before purchasing, match your skin tone, and say goodbye to the days of pacing Walmart cosmetic isles, guessing which foundation shade is best.  

powder foundation:
MAC Mineralized Skin Finish (Very Light)


Affectionately called MAC MSF in the beauty community, this powder creates a beautiful canvas. Use this over foundation, BB cream, moisturizer, primer, and even apply to a bare face with a damp brush and this will make my face look polished, matte, and flawless.

This is my favorite method (forward to 2:52) to apply MSF, and it gives full coverage when applied this way- my favorite!

eyeshadow palette:
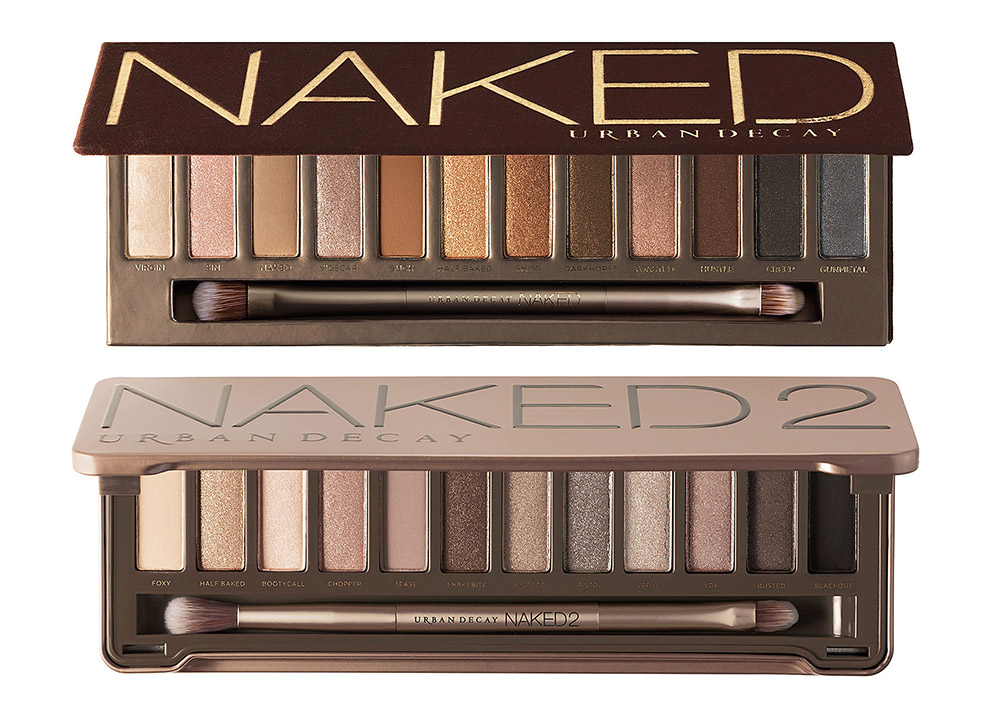
Urban Decay's Naked, Naked 2, and Naked Basics.


There's a reason you can't stop hearing about these palettes. The shadows are long lasting and make blending a piece of cake. The formulation is admired by professionals and teaches newcomers the eyeshadow standard. Each Naked palette has it's own claim to fame, and I don't know if I could choose a favorite. I recommend going to your nearest Sephora or Ulta to check each one out and see what colors you'd like to start with. A makeup-acher must have.

the rest of my 2012 holy grails after the jump

Sunday, February 17, 2013

welcome to pinkache!


I've been makeup crazed since I can remember. My mom can attest to my second grade beauty regime of smearing Smackers glitter-goop all over my eyelids every morning before school. Despite her plea for me to stop going to school looking like a disco ball child, I couldn't stop! I had a pinkache! I needed some glitz and glamour to get through the day! 

I do my best soul searching standing in front of my brushes and prized products as I paint on the person I want to be each day. Makeup is my therapy. It's my preferred art form and my outlet of self expression. This blog has been cooking in my mind for quite some time, and I'm thrilled it's finally coming to life! 


Check out what to expect on pinkache after the jump!