Showing posts with label makeup. Show all posts

Thursday, April 4, 2013

easy seXXXy smooth lips


Are your lips often chapped, dry, and look cracky when you apply lipstick? Do you often forgo an amazing red lip because you believe you can't pull it off? Girl let me help you.
 
what you need
Skinny Girl Lip Scrub
or any lip scrub
 
what you need to do
Wash your face, making sure to get your lips hot, wet, and steamy.
 
Dry off your lips, and apply your lip scrub. I usually just apply and rub the exfoliant with my finger, rather than treating it like a chapstick. Scrub your lips for 1-2 minutes. When you're done, wipe off all product with a warm paper towel. Apply a moisurtizing balm to your lips - I like eos or Carmex. Wah-la! You are ready for sexy lipstick.
 
Best to start with a lip liner, and then follow up with classic hollywood red lipstick. They make every girl look like a million bucks, so there's no reason you shouldn't do it!
have fun.   :)
 

I'm wearing Jordana red lip liner and Maybelline lipstick 625 in ARE YOU RED-DY
Revlon nail polish in Ruby Lounge
Moree on Skinny Girl...
Skinny Girl lip scrub was released in 2011, back when Real Housewife Bethany Frankel still owned Skinny Girl. When the brand was under Frankel, Skinny Girl had just a few beverages and all types of interesting makeup products, like body shimmer, facial masks, and lip scrub. Now the line is focusing more on cocktails and adult beverages. I hope they keep the beauty stash around - I really like the body shimmer too!

Saturday, March 23, 2013

Brush Week: 7 Brushes You Need

the basics.

My heart sinks when I see people use the cheap spongy applicators that sometimes come with shadows, powders, and foundation. Reason being - they apply your makeup horribly and are incredibly unsanitary. Most makeup enthusiasts would agree - your makeup brushes are arguably more important than your actual makeup products. 

the seven brushes you need:

stippling brush. 
Say hello to my little friend, the Mac 187. It's technically a stippling brush, but it does an awesome job of making skin look airbrushed and perfect. This is the kind of brush that can make your drugstore foundation look like a million bucks. Here's how to use a stippling brush. 

powder brush. 

Use a powder brush after applying water based foundation to lock and seal your makeup all day. I use this brush differently than most, and I learned the technique here (fast forward to 3:00). Instead of fluffing the brush around your face with powder on it, pack the product on the sides of the brush bristles, and pack it onto your face. This will keep your makeup to stay in place all day. After applying, lightly brush off excess from your face so it doesn't appear cakey. I also use a powder brush after contouring to blend any harsh lines. 

blush & bronzer brush.
Okay, so if this was "top 8" brushes, blush and bronzer brushes wouldn't be in the same category. However, in a pinch I can use the same brush for both without noticing any real difference. To illuminate your face and give it a glow, use a blush brush (say that five times fast) to swipe some blush or highlighter on your upper cheekbones. This brush applies a light and even layer and allows your to easy big pigments on top of each other. With bronzer, sweep into the hollows between your cheekbones and jaw. 

stiff eyeshadow brush.
Use this brush as your primary eyeshadow applicator for lid colors. 

crease brush.
Use this brush to apply colors into your crease. Crease colors are also known as a transition color, because it helps give your makeup more dimension. 

dome eyeshadow brush.
Use this brush to blend all your eyeshadows after they've been applied. This gives your eye-makeup a flawless finish, and will ensure no one is seeing weird eyeshadow lines or definitions that aren't supposed to be there.

eyeliner/brow brush.
One of my favorite brushes. This bad boy is amazing for lining your bottom rims, cutting your crease, and even applying a dark eyeshadow as a liner. I have several of these brushes because depending on the bristles, it can be used so differently!

so there you have it!
I hope you all enjoyed BRUSH WEEK as much as I did, and leave any questions below. Brushes are not best learned from reading a blog, but instead getting in front of a mirror and trying it all out. So go, have fun, because that's what this is all about. Till next time! 


Thursday, March 21, 2013

Brush Week: Quick and Easy Everyday Makeup


Perfect makeup when you don't feel like makeup


I wouldn't be honest during BRUSH WEEK if I said you always need to use a brush. This look requires NO brush, and it makes you look like you took way longer to get ready than you actually did. So put the brushes away, and learn this gorgeous but subtle look. 

I realize that when you think of subtle, you probably don't think Lady Gaga. But hear me out - Gaga wore a makeup look two years ago (while on her Monster Ball tour) that I copy every time I sleep in a little too late. I should totally do a video tutorial of this... I promise I will when I get a camera. 

get the look.

part one: eyes and lips
The overall concept of this look is heavy top lip liner and a bold/bright lip color. No need to go crazy with blush or bronzer. Any eyeliner works (gel, liquid, pencil.) Just make the line thicker than you normally do. Don't do a cat eye -  it looks really weird in my opinion.  For the lip, make sure you a color that is a bit bolder than light pink. Think barbie pink, coral, or red lipstick. A  tinted balm is even better; Maybelline Whisper is a good option because it looks like a lipstick but feels like a moisturizer. Perfect for those rushed mornings. :)

part two: face
The other part to this look is a good foundation or BB cream. You can apply your foundation/ BB cream with a blending sponge to make the look even more flawless - thus making it look even less like you're in a hurry. The best part - it takes half the time a brush would. (We're in a time crunch, remember?)  Here's the expensive beauty blender that everyone's talking about, and here's the $4 one of Walgreens that works just as good. To use a beauty blender properly, start by running it under warm water, and then squeeze all the excess out. Use the beauty blender to pat and smooth your foundation onto your face - it's amazing. Try this look next time you're in a rush - I want to know if you like it!

As always, post pictures if you try.


Monday, March 18, 2013

Brush Week: Best Kept Secret

The most beautiful makeup of a woman is passion. But cosmetics are easier to buy.
-Yves Saint-Laurent

Craft stores: The mecca of inexpensive professional brushes.

I took a trip to Michael's this past weekend and lo and behold... I came across the mecca of affordable professional brushes! A huge aisle, full of every type of brush you can imagine. The best part, 99% of the brushes were under $10. A girl could save some serious cash shopping like this!

Art brushes are one of the best kept secrets in makeup. A $25 eye shadow brush can easily be swapped for a high quality $4 'art' brush. I promise - you or your makeup won't know the difference. And geez - check out the selection!! I found a dupe for nearly all of my brushes except for a foundation brush. This is amazing news for beginners who want to experiment with application tools but don't want to drop $150 in the process. It's also amazing for junkies like me who can never get enough. 

I picked up a Grumbacher 4620 brush identical to a professional gel/powder eyeliner brush I had my eye on, and for a tenth of the cost ($4.) The only con - lots of the brushes have really long handles, but we can handle that. ;)

Sunday, March 17, 2013

Brush Week: Cleaning & Care

Every artist dips his brush in his own soul, and paints his own nature into his pictures. 
-Henry Ward Beecher


Yesterday was the dreaded brush cleaning day.  Keep reading to learn the easiest way to make them last for last years. 
________

how-to: clean your brushes.
Routine brush cleaning keeps your tools performing top notch and decreases the chance for bacteria-caused breakouts. You don't need to go out and buy expensive brush cleaner, you have everything you need at home. Here's an easy how to!
  1. Lay out a paper towel where you'll be drying your brushes (next to a sink.) Create a small elevation with the towel by folding about 3 inches together. You'll set your brushes on a downward slope after cleaning to keep water from entering the brush handle. Too much water inside the base can ruin your brushes. See picture for an idea of how to fold. 
  2. Grab a basic hand soap and push a half pump (about pea sized) onto your palm. Slightly dampen your first dirty brush with warm/hot water and swirl the bristles into the soap to create a small lather. 
  3. Once lathered, continue the swirling motion on your hand under the facet. Keep swirling until the water runs clear. For really dirty brushes, I apply soap twice. 
  4. After your brush is clean, squeeze any excess water from the bristles and lay on the towel. Make sure the bristles are on the low end of the towel so any excess water drains downwards.
  5. Leave to dry over night, turning over once if your are a little OCD like me. :)

Monday, March 11, 2013

steal my lashes

they're real.
If there's one thing I get complimented on, it's my lashes! I attribute it completely to mascara application. Keep reading to see how you can steal my lashes.

line your lashline.
Even if it's just a thin line, make sure to line your upper lash line. This will make the base of your lashes look thicker and instantly fuller. 

layer your mascara.
Most important step. The trick is not just adding layers of mascara, but add layers of different types of mascara. My tactic: start by adding 2 coats of a mascara that lengthen your lashes without clumping. This provides a nice clean base to build from. While your lashes are still wet, layer your favorite volumizing mascara. Continue adding coats of the volumizing mascara until you find your desired effect. On days that I want really dramatic long lashes, I add another coat of a super black volumizing mascara. In all, I can apply about 10 - 15 coats, easy. The key is finding mascara formulas you like working with. A bad formula will make this look turn sour quickly. This routine may seem extreme at first, but once you see you lashes, you might never look back!

get in there.
If you want huge lashes, you've got to get up in a mirror and coat  e v e r y--s i n g l e--l a s h. Experiment with the way you hold the mascara wand, they way you coat your lashes, ect. I can easily spend up to 10 minutes(yikes!) on my lashes, so adjust this routine however you'd like. Who wants to see a video tutorial??


*I've linked my current mascara routine products. My routine changes monthly because I love trying new products. Maybe I'll post about my all time favorite mascaras!

Friday, March 8, 2013

Concealer 101: Hey Uncle Fester!


Alright ladies. You want to hide your under eye circles? You can. It's going to cost you a little bit of money, and you're going to have to take a few minutes to learn. But if you are committed, it will be the best thing you ever did for your face. Keep reading to learn how to hide those raccoon eyes!

Step One: Trip to the store
Drive to your favorite high end makeup pro store or counter (Mac , Bare Minerals, Clinique, Sephora, ect.)  Ask to speak with an employee with several years of artistry experience. Tell them exactly what you're looking for - a full coverage under eye concealer. They'll recommend and try as many samples on you as needed to find your perfect match and shade. Congrats - hardest part is over! 

Step Two: Old-dog learns a new trick
After you find a concealer you like, ask the employee to teach you how to apply it. This is very important because if you don't understand how and where to place your concealer, it's not going to hide anything. A good employee will be more than happy to teach you.

Step Three: Keep it up
The first week using your new concealer is going to be weird. Unless you're a natural pro, it will take a little trial and error. Just keep at it- nothing worthwhile comes easy.  :)
______


concealer: pinkache's powerful tips:

  • Apply in light layers. Build your concealer, don't slap it on like a sloppy joe!
  • Drugstore concealers are usually disappointing. Concealer gets my approval to splurge a little bit.
  • Always set your concealer with your favorite powder foundation or translucent mattifying powder. This will keep it firmly in in place all day. It makes your whole face look fresh all day.
  • Take it back if you don't like it! 99% of the time, professional makeup retailers graciously allow returns. They understand - you have to find what works for you!

pinkache recommends:

  • Laura Mercier Secret Camouflage Concealer
  • Benefit Boi-ing Concealer
  • Kat Von D Tattoo Concealer (even if you don't have tattoos!) I don't like her either, but she makes a pretty nice concealer.
Good luck! Comment your pictures!

Wednesday, March 6, 2013

favorite lipsticks: drugstore dupes

Hi. Do you love lipstick? Do you love saving money? Perfect - read on.

A "dupe" is a cheaper alternative, or duplicate, to a higher end luxury product.  There are many self proclaimed dupes out there, but you never really know till you try.  For example - think GT Cola VS Coca-Cola, or Mountain Mist VS Mountain Dew. A lot of times, the cheaper version just seems off.

Revlon Berry Haute
Once I dabbled in high end lipstick, I realized for a fraction of the price, you really don't have to compromise on quality. Best part: they are nearly identical to popular high end lipsticks. Here are my faves. You can purchase all my favorite drugstore lipsticks at any drugstore (walmart, walgreens, CVS, target, ect ) or Ulta. You're about to notice an annoying trend, but whatever. 

Revlon Berry Haute
Dupe for: MAC Up the Amp
This gorgeous plum purple is so versatile and looks great on everyone. It's dark enough to look festive for the winter months, but it's got a bright toned purple to it that justifies wearing it in the spring and summer months too. It's super creamy and moisturizing.

Revlon Really Red
Revlon Primrose
Dupe for: MAC Snob
Ugh - this color! It's the perfect light pink that makes blondes look like barbie; and makes brunettes look like they are out for blood. Other than it's delicious hue, it's so light and smooth that you don't feel like you're wearing lipstick. I've repurchased this twice and will continue to do so! 

Revlon Really Red (I buy the matte finish)
Dupe for: MAC Russian Red
This is some Marilyn Monroe shixxx right here. I'm not a huge red lipstick wear-er, but when I am, this is my go-to. I also love blending this one with my next favorite to tone it down a bit. This color looks good on everyone, but I think it's best on blondes. 
NYX Circe 

NYX Circe
Dupe for: MAC Viva Glam Gaga II
It was a sad, sad day when the Gaga II lipstick stock was finally out, those pesky limited editions. So I was ecstatic to find something that would at least fill the void. Fortunately the color match is almost identical, but the formulation is sub par. Oh well - it's still one of my faves. The color is a nude with an orange tint. Sounds weird, but goes amazing with a smokey eye and a night out. And for $4, I love it!

Monday, March 4, 2013

MAKEUP MISTAKES


It's a bit much.
We all make them.  Remember: only YOU can prevent makeup mishaps! Keep reading to see if you’re a repeat offender.

Overindulgence. A little this, a little that, and suddenly it looks like a unicorn exploded all over your face. Instead of trying to play up each and every one of your features, just pick one to go all out on and keep the rest simple. Translation: For days that you want to sport heavier eye makeup, keep your lips natural. And vice versa – if you’re want bright red lips, keep the eyes more neutral and simple. Once you get the hang of balance and colors, you can start messing with the formula.

Major case of color denial.
Color Denial.  We’ve all met her … she starts talking and all you notice is how her face and neck are two distinctly different colors. Tell her to get to a mirror and fess up to her true colors! Now, awkward question… Is this you? Sometimes you can’t help it – lighting in retail stores can be very different than those in the office/house. Your best bet is to test foundation before you take it home. Still, the easiest way to avoid the detached-face-look is blending. Your foundation shouldn’t stop at your face, but instead blend into your neck so there are no harsh lines. Just take any excess product left on your brush after application and brush from chin to neck. It’s a small trick that can save you some embarrassment!

Miley aces our test. Gorg!
Cakeface. Oh, cakeface. This is when you can actually see the layers of powder just hanging out on someone’s face instead of blending into the skin. And usually, everything looks okay until you get up close. I had a friend in high school, gorgeous girl, who had minor breakouts along her chin. To compensate, she ALWAYS had caked up powder and blotchy makeup was extremely unfortunate. It turned the very flaws she was trying to hide into the only thing people saw. People don’t usually notice their own cakeface, because to them, they’ve concealed imperfections and don’t pay any mind afterwards. Cakeface is caused by applying to much product, but it’s also about application. The round sponges that often come with drugstore products are fine at piling makeup on, but it doesn’t do a darn thing to blend into the skin. To combat, take a fluffy brush before you’re ready to go and sweep it around your face to remove excess product. If you are a drugstore sponge user, check out these quality and affordable brushes. If you are a beginner who wants to spend a bit more for quality, check out the Sonia Kashuk brush line from Target.

Saturday, March 2, 2013

MAGIC STICK

No joke, this lipstick is magic. It will only cost $31 from your rainy day fund, and your GUARANTEED to like it! I discovered the product on a recent video shoot from the hired makeup artist.When she mentioned her favorite was Dior, I thought no way am I spending $100 for a lipstick. She proceeded to pull it out of her bag and try it on me.

and Oh My Goodness.

Dior Addict Lip Glow works with your body's chemistry to create the PERFECT lipshade for your skin tone. I know it sounds crazy, but it really works. I've had it for about a week now and noticed it gives me either really bright pink or ruby red lips . The color turns a different shade on each person. The lip glow feels like a lipbalm - not chalky wax. This product is seriously heavenly and you need it. Go to Sephora and try it on this weekend!

It's expensive but so worth it - I am going to probably repurchase a million times. Don't you wanna know what your shade is?


Thursday, February 28, 2013

Blush Review: ELF Studio


ELF Studio Blush 


Who's obsessed with these?

ELF Studio Blushes retail for three dollars and, IMO, are match the quality of many high end blushes. I've noticed many professional makeup artists toting this around, but it's a bit taboo because of its extreme low price. I see both sides, but I tend to think the price tag is secondary to quality. Thoughts? 

And, for the record - there are several ELF products that are horrendous. But this is a gem! 

Here's what I love about ELF Studio Blush:
  • Super pigmented 
  • The packaging is eerily similar to $28 NARS blush compacts
  • Tons of product - 1.6 oz! That's AMAZING considering its only $1
  • Perfect for beginners and experts alike wanting to experiment without financial guilt
  • Little-to-no product fallout. 
  • ELF frequently introduces new colors so there's always new option
  • No brush included - I always hate the crappy brushes companies include. 
  • ONLY $3.00.

I won't lie - there's a bit of a catch. Check out the downsides after the jump.


Wednesday, February 27, 2013

natural everyday brows


Want natural looking brows without compromising form and structure? Your best bet is a brow powder and gel set. Benefit has a great option if you want to invest. I use ELF’s eyebrow kit everyday - it retails for only $3.00 and it works like the expensive stuff! ELF is sold in all Target stores and online.

HOW TO

Start by taking a thin angled brush and pat into powder. You can use any brown eyeshadow that is a shade darker/lighter than your hair. To apply, flick the brush on your brows mimicking the length and direction of growth through the length of your eyebrows. Here’s a quick video example from the beautiful SMLx0. After you get the desired shape, brush a thin layer of gel or a small amount of hairspray to keep the hairs in place all day.

Whether you like super defined or natural looking brows, it always helps to use concealer around the edges of to polish them up. Just do this with a small brush and then blend out. Good luck, and let me know if you try!

Saturday, February 23, 2013

take a hit of these beauties


Want a crash course in makeup? Each of the bloggers/youtube personalities make a living from helping people learn techniques that you would normally have to attend school to learn. We are so lucky to live in an age where we can learn infinitely from the comfort of our own living room. In the beauty community, these are some of the people you need to know.  They have each taught me so much about make, beauty, and life; and I’m excited to introduce you. I've linked this post like crazy, so go hog wild!


Kandee is THE makeup titan. She is the end-all be-all of the youtube/beauty guru/blogger community. Celebrity make-up artist Kandee Johnson’s appeal goes much deeper than her amazing celebrity makeup tips and tutorials – she also writes about life lessons, and even took her followers through the process of grieving her late father. Kandee embodies everything a role model should be, and can cheer the sourest of moods. Aside from Kandee’s exceptional attitude, she’s got beastly talent. Her costume tutorials will have you doing double takes while she transforms herself into your favorite Hollywood characters in 10 minutes or less.  If you enjoy beauty, makeup, costumes, and people who have a light shining from within, check out Kandee’s youtube channels and blog (she posts every day!). Join me in my Kandee addiction!
Goss translates his professional makeup experience into understandable and thoughtful short videos that make learning a piece of cake. He often features his own friends, who are not professional models, as his clients. Goss’s stays frank and honest with his viewers – he will tell you the pros and cons to a product or technique and you never have to worry that he’s being paid for his comments. I’ve learned so many techniques from him that have transformed my everyday makeup routine; my most favorite being his brush techniques for a flawless face. Goss regularly taps into celebrity pop culture – he often features top celebrities as a teaching subject for new skills and techniques. Check out Goss’s youtube channel for light-hearted yet informative videos that make you feel like you’re chatting with your bff.

No matter HOW BAD of a day I’m having, I can always count on Jermaine’s videos to make me laugh and remind me life should be fun. When work, family, finances, car problems, student loans, difficult people, low on gas, blah blah BLAH add up and make you want to crawl into bed and never come out – watch some JLOVESMAC1 and she will have you smiling ear to ear, maybe even lol-ing a bit, in no time. She’s a prime example of how to make your own happiness by diving into your passion. She also has the most adorable dogs that make frequent appearances.

I’ve been following SMLXO since before she became a big youtube sensation. She’s a gorgeous girl who seems very down to earth and represents the girls who love learning and developing makeup skills. She is going through the same learning process that many makeup lovers go through. Go through her videos and you can watch her blossom from the amateur we all were at one point to someone who has developed a great skillset. Check her out on her youtube channel here.

Who are YOUR favorite beauty gurus?


Tuesday, February 19, 2013

Designer VS Drugstore


It’s easy to feel like you have to use designer brands to do a quality job, but ‘you get what you pay for’ doesn’t always apply in the makeup world. To this day, I still opt for many drugstore options because they perform the same as designer labels (if not better,) and you save a ton of money in the process. In the past week, I’ve worked with two professional makeup artists who agree that many high end products aren't worth shelling out the extra dough when given the option. 

Mascara: Go Drugstore
Drugstore brands tend to have tons of options for the exact effect you’re looking for (volume, length, shape) and IMO work much better than designer brands. The product lasts you a long time, and they exceed my expectations every time. For long and voluminous lashes you have to mix products anyway, so mascara price stays manageable when you go drugstore. So many drugstore mascara brands are kicking ass right now with their products, packaging, and marketing – it’s an amazing time for consumers right now!

Higher end products have the tendency to irritate your eyes, clump up your lashes, and dry out extremely fast. A designer mascara can easily run you anywhere from $20 - $50. For me, drugstore mascara is a no brainer.

Foundation: Go Pro
A wise woman builds her house upon a rock, right? Foundation is your rock: sturdy, reliable, & trusted. If you build your house upon the sand, aka cheap foundation, you may find yourself disappointed with the color match, coverage, skin reaction to the formula, and worst of all, you may have wasted your money because now you have a product you really can’t use. Oh and there’s the possibility doesn’t actually covering your blemishes, but just looking slapped on. Not cute!

Now hear me out - this is not to say that you have to spend a fortune on foundation. But you should definitely go to a store where you can sample the foundation, color match, test your skins reaction, and wear it for a day before purchasing. Places like Ulta, Sephora, and most department stores will even give you a free three day supply of foundation to test for a few days. AND they can help you pick which foundation will work best with your skin type. When you pick a random drugstore brand, you may end up disappointed with the color match, breaking out from the formula, and worst of all, you may have wasted your money because now you have a product you really can’t use. You can get away with just $20 for a good foundation. My favorite foundation (MAC Studio Scuplt in NW20) runs me $43.

I will say that lately, drugstore brands have stepped up their game in the foundation department. Maybelline FitMe and Loreal TrueMatch are helping consumers save money without losing too much quality. So tell me – have you found an amazing drugstore foundation?

Lipstick: It Depends
Lipstick is like shampoo. We’d all love to always use the super expensive shampoos, but most of us know deep down that a bottle of Herbal Essence will do the trick. Lipstick’s kinda the same way. I love my drugstore lipsticks almost as much as I love my MACs. Revlon lipsticks are always extremely impressive. I’m not a fan of Maybelline lipsticks because they are usually all shine and very little pigment. 

Monday, February 18, 2013

Favorites: 2012

From my makeuped & pinkached heart to yours, my favorite products of 2012

foundation:
MAC Studio Sculpt (NW20)


Everything I thought about foundation changed when the MAC artist first painted this on my face. It was easy to apply, left my face looking & feeling flawless, and stayed put for 8 hours. It's a buildable gel-based foundation that leaves your skin with a dewy complexion. If you prefer matte skin like I do, just apply your favorite powder on top.  I've repurchased 5/6 times. The gel-based formula is best for normal to dry skin, & may be too much for oily skin types.

Foundation is one of those products every girl should should invest in. Buying higher end ensures you can sample before purchasing, match your skin tone, and say goodbye to the days of pacing Walmart cosmetic isles, guessing which foundation shade is best.  

powder foundation:
MAC Mineralized Skin Finish (Very Light)


Affectionately called MAC MSF in the beauty community, this powder creates a beautiful canvas. Use this over foundation, BB cream, moisturizer, primer, and even apply to a bare face with a damp brush and this will make my face look polished, matte, and flawless.

This is my favorite method (forward to 2:52) to apply MSF, and it gives full coverage when applied this way- my favorite!

eyeshadow palette:
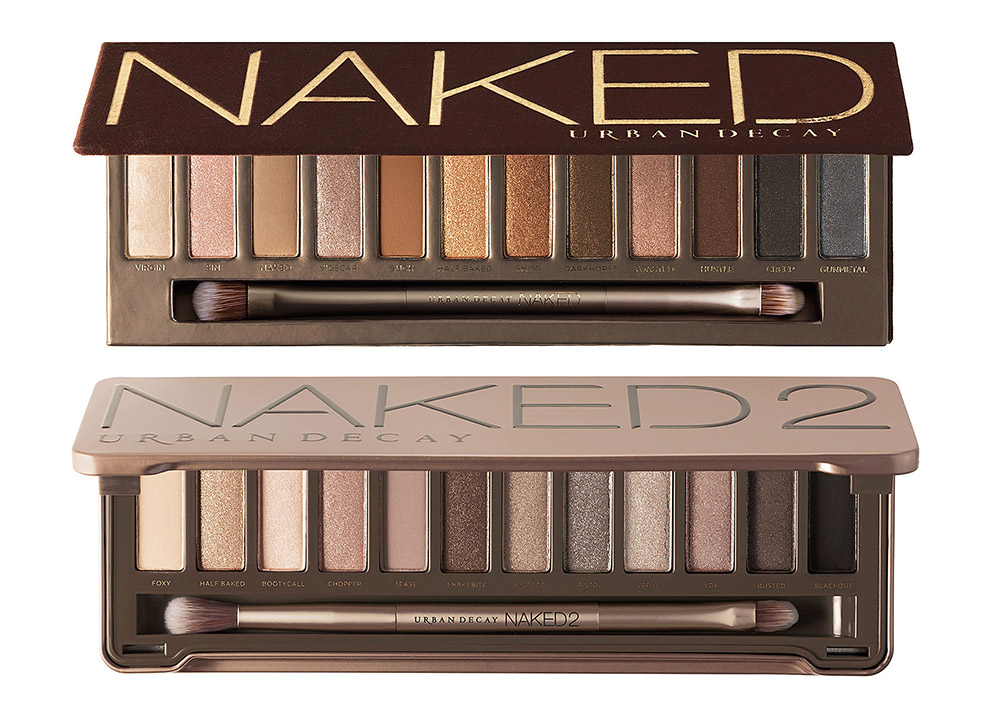
Urban Decay's Naked, Naked 2, and Naked Basics.


There's a reason you can't stop hearing about these palettes. The shadows are long lasting and make blending a piece of cake. The formulation is admired by professionals and teaches newcomers the eyeshadow standard. Each Naked palette has it's own claim to fame, and I don't know if I could choose a favorite. I recommend going to your nearest Sephora or Ulta to check each one out and see what colors you'd like to start with. A makeup-acher must have.

the rest of my 2012 holy grails after the jump

Sunday, February 17, 2013

welcome to pinkache!


I've been makeup crazed since I can remember. My mom can attest to my second grade beauty regime of smearing Smackers glitter-goop all over my eyelids every morning before school. Despite her plea for me to stop going to school looking like a disco ball child, I couldn't stop! I had a pinkache! I needed some glitz and glamour to get through the day! 

I do my best soul searching standing in front of my brushes and prized products as I paint on the person I want to be each day. Makeup is my therapy. It's my preferred art form and my outlet of self expression. This blog has been cooking in my mind for quite some time, and I'm thrilled it's finally coming to life! 


Check out what to expect on pinkache after the jump!